Generally speaking, basic disks and dynamic disks are 2 types of hard disk configurations most often used in Windows. Basic disks are often more suitable for ordinary computer users. While for advanced users and IT administrators, if they would like to improve the performance of computer with more than one hard disk, dynamic disks will be their choice. And compared with basic disk, dynamic disks have the following advantages:
1. Dynamic disks are able to create volumes that span multiple disks. In this case, you can get better use of your available disk space by combining areas of unallocated space in volumes that go across multiple disks.
2. Dynamic disks have the ability to create fault-tolerant volumes (mirrored and RAID-5 volumes).
3. Data can be saved to different hard disks to form striped volumes, which improves disk performance by letting more than one disk drive read and write data.
It is because of these features that many people want to convert basic disk to dynamic disk. So in this post I will introduce you how to convert to dynamic disk without losing data by using the Windows built-in Disk Management and CMD command.
In order to avoid unexpected data loss while converting disk from basic to dynamic or dynamic to basic, you’d better create backups for important data in the disk that you want to convert to dynamic.
Convert to Dynamic Disk without Losing Data Disk Management
Step 1. Right-click Windows Start menu and choose Disk Management.
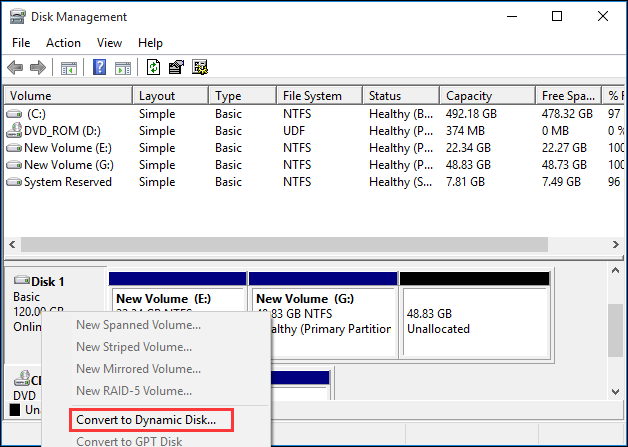
Step 2. Right click the target basic disk, and select Convert to Dynamic Disk from the pop out window.

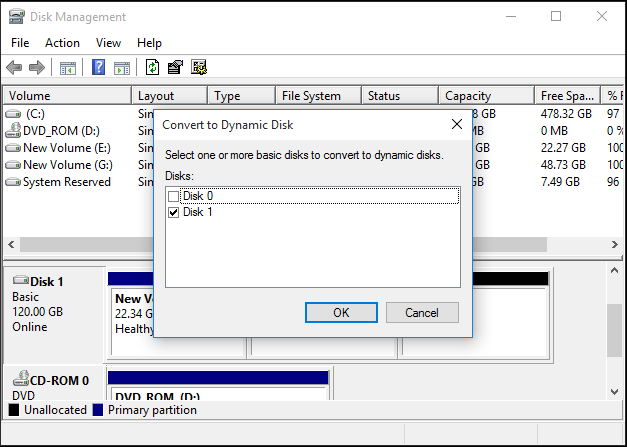
Step 3. Make sure it is the right disk that you choose to change to dynamic and click OK.

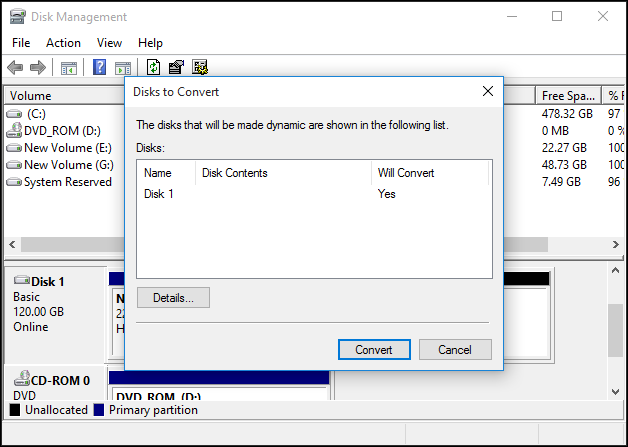
Step 4. Click Convert to continue.

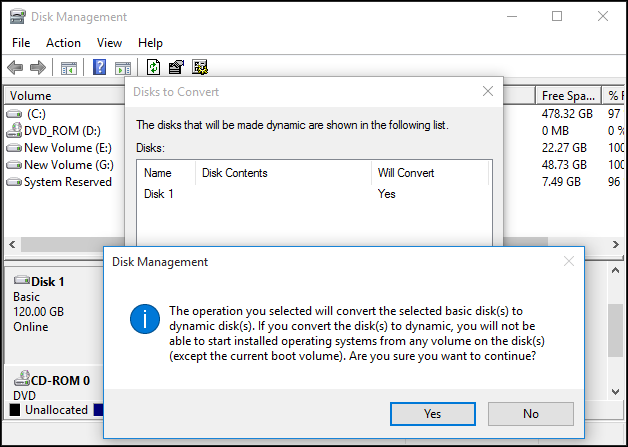
Step 5. Read the note and click Yes to complete the conversion. This note shows you cannot start installed operating systems from any volume on this disk except the current boot one. That is to say, all Windows OS except the current running one will be unbootable. Therefore, users who are using dual or multi booting Windows on one disk had better not convert basic disk to dynamic disk if they want to run all Windows well.

Convert to Dynamic Disk CMD
Step 1. At Windows 10 Start menu, right-click the menu and choose Command Prompt (Admin). If you do not see the Command Prompt (Admin), you may enter the Cortana search box and type cmd, then from the best match right-click Command Prompt and click Run as administrator.
Step 2. In the command prompt, input diskpart and press Enter.
Step 3. Input list disk and press Enter.
Step 4. Select the disk on which you want to convert. If you want to convert disk 1 to dynamic disk, you may input select disk 1 and press Enter. (1 is the disk number of the disk that you want to convert.)
Step 5. Input convert dynamic and press Enter.
As you can see, it is very simple for us to convert basic disk to dynamic disk without losing data. But what if you want to convert a dynamic disk to a basic disk?
Actually, basic disk is more popular than dynamic disk and it can be found in most PCs. The management of basic disk is also much easier than that of dynamic disk. So to simplify the management of disk, ordinary users hope to convert dynamic disk to basic disk safely sometimes.
However, if you want to convert a dynamic disk to basic disk, you have to delete all existing dynamic volumes. In Windows 10 Disk Management, right-click each volume on the dynamic disk that you want to convert to a basic disk, and then click Delete Volume for each volume on the disk. Obviously, this operation will lead to data loss, but with a third party software MiniTool Partition Wizard, you can convert a dynamic disk to basic without data loss, so you may try this way as well.
Summary
In short, you can change basic disk to dynamic disk without data loss with Windows build-in Disk Management or CMD. And then you are able to convert dynamic disk to basic disk without deleting any data by using MiniTool Partition Wizard. Now you can change to dynamic disk or basic disk at ease. Hope this post helps you on how to convert to dynamic disk.


